When preparing your concrete surface, it is important to understand which set of diamonds will give you the proper results. Even with the right equipment, the wrong set of diamonds can cause problems ranging from scratches to glazing. This happens because the density and hardness of concrete can vary greatly, and is directly affected by what materials were used to create it. Different materials are used in different regions due to what is most readily available. The best way to know which diamonds to use is to perform a MOHS hardness test on your concrete before grinding.
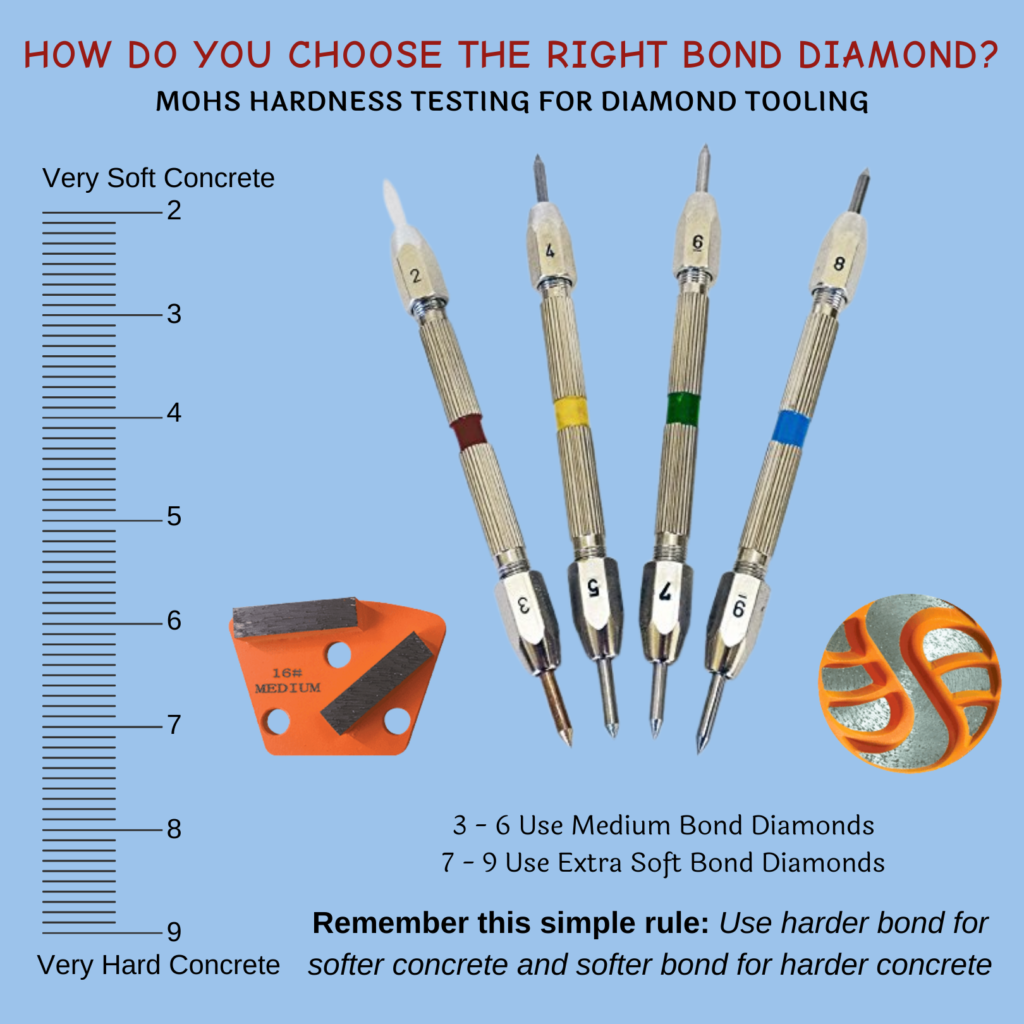
First, you need to learn how to perform the test properly. The MOHS hardness test kit that we have available for your use comes with tester pieces, which are small thin rectangular pieces of different materials that scratch on different levels. There is a label on each piece identifying which hardness level that material is. The objective is to use these pieces to first train your hand to use the correct amount of pressure with these guides. Only then, will you understand how to properly test your floor. Hold the tool like a pencil and press the point into the tester piece. Then pull it forward to draw a line. When it makes a scratch, remember the amount of pressure used. Do NOT try and force the tool to scratch the surface. Repeat this process until the amount of pressure feels natural.
After you have learned the proper pressure to apply:
- Hold the #9 tool like a pencil and press its point on the concrete surface.
- Pull a 2” line toward you and note mentally how much it scratched. (When the tool leaves an etched line on the surface of your concrete, it indicates that the floor is softer than the numbered tool just used.)
- Continue to progress down in numbers until the numbered tool you’re using doesn’t scratch.
- The concrete’s hardness will be the previous number of the tool that didn’t scratch the concrete surface.
- If there is a questionable result, test another fresh/clean area of the concrete surface to establish the hardness of the floor on average.
- After you know your concrete’s hardness, use the corresponding color of metal-bond diamond sets with your grinder to open the floor.
Mohs Test Hardness Results – Which Diamond to Use
| Hardness of 3 – 6 = Medium Concrete | Use Medium Bond Diamonds |
| Hardness of 7 – 9 = Hard Concrete | Use Extra Soft Bond Diamonds |
Overall, you should remember this simple rule: Use harder bond diamonds for softer concrete and softer bond diamonds for harder concrete.
More detailed instructions are included in the test kit and should be strictly followed. You can also find a helpful video available from WerkMaster at https://www.werkmaster.com/mohs-concrete-tester.
It is also important to note that you can repeat the hardness test before each step of grinding if needed. This can be useful because many times the cap of the concrete is harder than the slab’s matrix. So, if you continue using the set of diamonds that were required to get through that hard cap, the new hardness level can abrade the softer-bond diamonds, resulting in excessive wear of the tooling.
Pay close attention during your grinding process to troubleshoot problems early. Are your medium-bond diamonds glazing and heating up? Switch to extra soft bond diamonds! If you are having glazing issues, we also recommend reducing your grinding speed and RPM. Grind Slower! Lastly, you may want to consider using some water on the floor if you continue to have glazing problems.
PREPARE YOUR SUBSTRATE—Before applying any epoxy, the concrete must be prepared by grinding, filling cracks (if necessary), and then diamond grinding the field and edges. Wood floors are prepared by sanding. Preparation varies depending on the condition of the substrate.
Pro Tip: Conduct moisture testing 72 hours before grinding concrete.
MOISTURE VAPOR TRANSMISSION PRIMER COAT — If moisture vapor transmission (MVT) above 3 lbs. is present, a special MVT primer can take care of that. MVT primer cannot be tinted. If using an MVT primer, an additional primer coat product should be used on top, and that layer should be tinted a solid color.
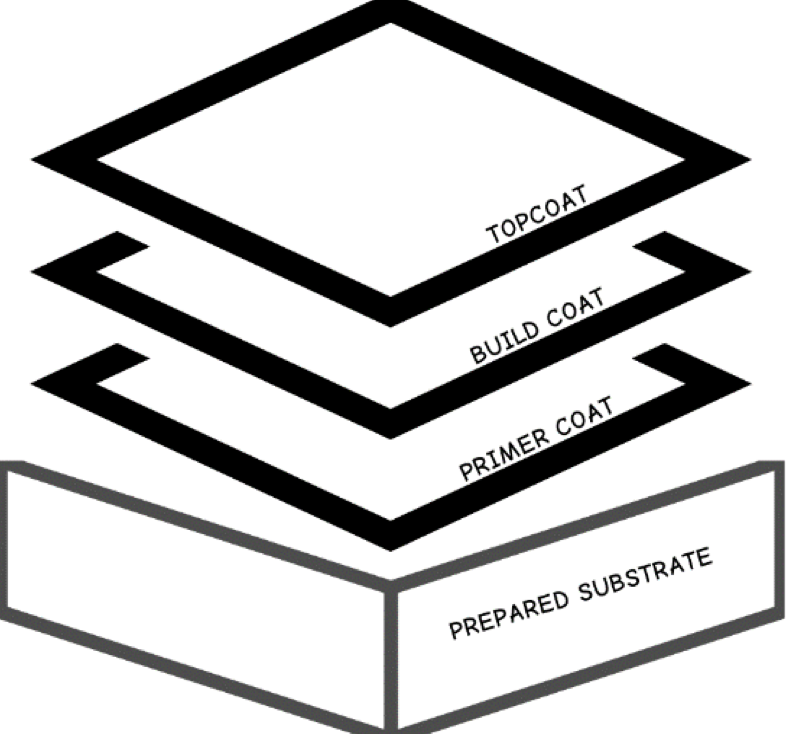
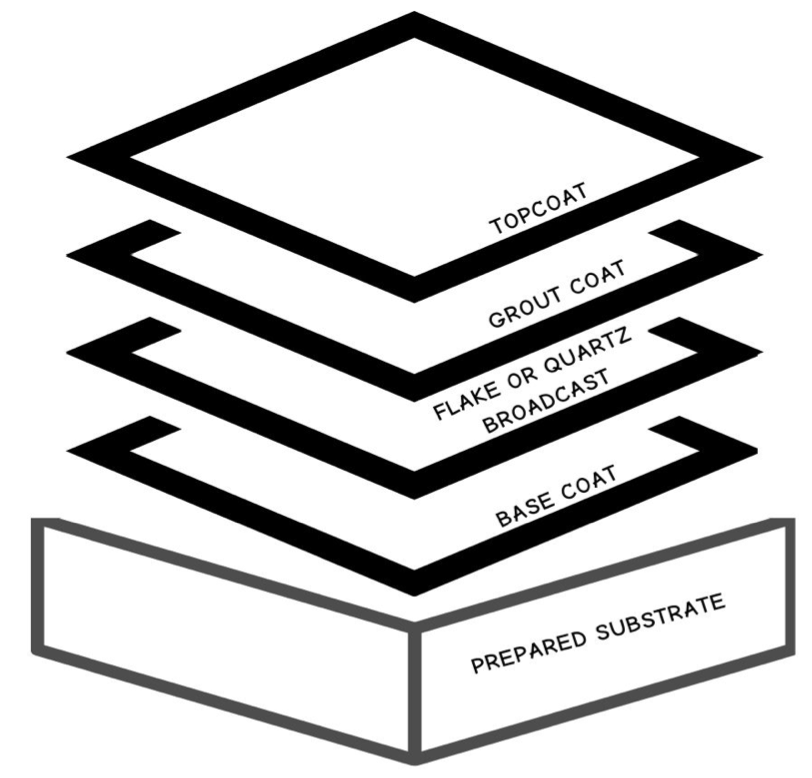
| STANDARD EPOXY SYSTEM (Solid Color or Metallic) | BROADCAST EPOXY SYSTEM (Flake, Quartz, or other) | |
PRIMER COAT—Concrete is porous, so it is imperative to coat with a primer prior to applying build and topcoats. This is true of other substrates as well. A primer reduces bubbles or outgassing. A solid color tint added to the primer is recommended. BUILD COAT—As the middle layer, the build coat is the main body of the system, providing the desired level of thickness and contributing to weight-bearing and impact resistance. Solid color tints or metallic pigments are usually incorporated into this layer. TOPCOAT—This last layer is the most critical for durability and for chemical, stain, and slip resistance. Anti-slip additive can be added. Colorants or glitter can be incorporated to provide a desired esthetic, but the topcoat is usually applied clear. A good topcoat takes the brunt of the wear, and years later, if needed, it can be sanded and re-topcoated without having to re-do the primer and build coats. This layer is applied very thinly. | BASE COAT— This coat serves as both the primer and build coat you would see in a standard system. A solid color tint added to the base coat is recommended. FLAKE OR QUARTZ BROADCAST—Material is broadcasted into the base coat while it is wet. Once dry, exess broadcast material is scraped off and the floor is sanded with sandscreens. GROUT COAT—This layer is applied clear, so the broadcast beneath it can be seen. Product is applied thickly to reduce the rough texture of the broadcasted material. TOPCOAT—This last layer is the most critical for durability and for chemical, stain, and slip resistance. Anti-slip additive can be added. Colorants or glitter can be incorporated to provide a desired esthetic, but the topcoat is usually applied clear. A good topcoat takes the brunt of the wear, and years later, if needed, it can be sanded and re-topcoated without having to re-do the underlying layers. This layer is applied very thinly. | |
 |  |
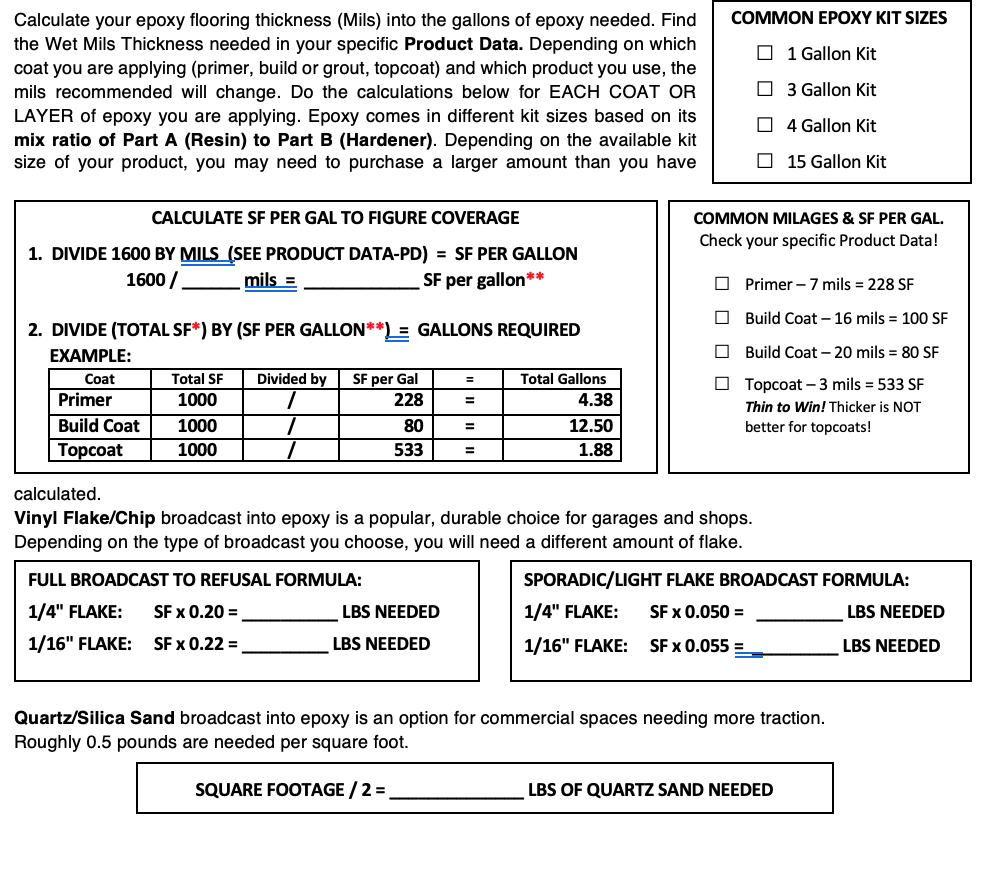
Epoxy flooring installation involves quite a bit of math. Here are a few basic calculations to help you calculate your needed materials. These calculations are rough guides only and you are responsible to verify your results.
CALCULATE TOTAL SQUARE FOOTAGE: Length _______ x Width _______ = ______________ SF*
*This number needs to be accurate! All other calculations are based on it.
Epoxy flooring is measured in Wet Mils Thickness. Mils is the industry-standard measurement used for epoxy. This is notthe same as millimeters.
1 mil = 1/1000th of an inch
1 millimeter (mm) = 39.27 “Mils”
It is imperative to read and thoroughly understand all product safety data sheets and manufacturer application instructions. Customers are solely responsible for the outcome of their projects, and Alaska Resin Supply does not in any way guarantee the outcome of any product’s use or compatibility.
Quantities and products needed depend on the scope of the job, number of installers, epoxy products, and square footage.
Alaska Resin Supply can give a general recommendation, but will not accept any responsibility for the outcome of your DIY project.
It is the customers responsibility to read all product data and determine how much materials they want to purchase for DIY Projects.
| DIY TOOLS & SUPPLIES TO CONSIDER |
| Spiked Shoes |
| 18” Roller Frames |
| 18” Roller Covers (Shed Resistant) |
| 18” Plastic Tray/Pans |
| Chip/Varnish Brushes – 1”, 2”, 3” |
| 9” Roller Frames |
| 9” Roller Covers (Shed Resistant) |
| 4” Roller Frames |
| 4” Roller Covers (Shed Resistant) |
| Drill Power Mixer Paddles (Different sizes) |
| Wooden Paint Mixer Sticks |
| Empty 5 Gallon Buckets |
| 5 Quart Mixing/Metering Pails |
| 5 Quart Pail Liners |
| 2.5 Quart Mixing/Metering Pails |
| 1 Quart Mixing/Metering Pails |
| 18” Straight Edge Squeegees |
| 18” Notched Squeegees |
| Spiked Roller (Several different sizes) |
| Magic Trowel – (Several different sizes) |
| 5/1 Tools |
| Utility Snap-Off Blades |
| Box of Latex Protective Gloves |
| Safety Glasses |
| N95 or Equivalent Protective Respirator |
| Calcium Chloride Moisture Tests |
| Threaded Extension Poles |
| Wet Film Thickness Gauges (Mil Gauge) |
| Duct Tape |
| Masking Tape |
| Masking Paper/Masking Film (Plastic) |
| Box of Rags – (White T-Shirt Material) |
| Xylene – 1 Gallon (For Tool Cleanup) |
| Drywall Floor Scraper (For Flake) |
| Plastic Taping/Putty Knives (Various Sizes) |
| Wooden Paint Stir Sticks |
A wide range of equipment is available for properly preparing a concrete slab for epoxy installation. There are diamond grinders, shot blasters, scarifiers, and more! Here are some basics to get you started.
- Are you prepping a basic or pre-coated concrete slab? Diamond grinders are the best option for projects that require removing coatings or prepping most concrete slabs for epoxy. They maintain as much surface material as possible.
- How many square feet do you need to prep? The larger the job, the bigger you want your diamond grinder to be, so you save time grinding.
- Are there stairs to navigate? Multiple levels? You may not want a large, heavy grinder for these conditions. Pick out a lighter, more mobile model instead.
- Are you trying to go deep into the concrete? A scarifier might be better for you. Scarifiers scrape away up to ¼” deep per pass in multiple straight grooves.
- Are you preparing a metal or other industrial surface? Shot blasters use metal beads “shot” out of a machine to “blast” away tough debris and contaminants. This works on concrete as well, and can be used to both clean and prepare the surface for coatings. You will need a magnet broom to collect the stray metal shot.
- Are you working indoors? You will need a pulse vacuum or dust extractor! Pulse vacuums are designed to clean up troublesome concrete dust without clogged filters.
- How will you be powering your equipment? You may want to investigate your options for propane equipment models or a portable generator if on-site power is not available. Most equipment requires 220 Volt power and a minimum 30-50 AMP breaker.
- Are you installing epoxy on a wood subfloor? Have you exceeded your epoxy products’ re-coat window? Are you installing a flake epoxy system? In all of these situations, you will need a floor sander.
- Are you trying to remove an old epoxy coating, glue, adhesive, mastic, or otherwise nasty material? Talk to us about the specialty tooling available for our concrete diamond grinders. We have carbide cutter blades, Polycrystalline Dimond tooling (PCD’s), and other options that work wonderfully at removing these materials.
It is recommended to reserve your equipment early. If you don’t reserve your dates, your equipment may not be available when you need it. Reserve equipment today.
We recommend using a three-coat epoxy flooring system on any floor. A standard three-coat system includes an epoxy primer coat, a base coat, and a clear topcoat. You typically use a different epoxy product for each coat. However, in some cases, you can use the same product for more than one coat. Using a two-coat system is also possible, but would be the minimum type of system we recommend.
MOST IMPORTANT: Always refer to your Product Data!
Choose Products That Meet the Needs of Your Floor:
There are questions you will have to answer to identify which products are right for your floor.
- What kind of material is your flooring substrate? Concrete? Gypsum? Wood? Tile?
Depending on what kind of substrate you are dealing with, the recommended products change. For example, wood substrates require an epoxy that is more flexible than standard. - Does your substrate have any moisture issues?
Moisture testing is recommended for concrete. If high moisture is identified, it is recommended to use a Moisture Vapor Transmission (MVT) epoxy primer coat to create a moisture barrier to protect the floor and prevent disbonding. - Is your substrate damaged? Do you need to apply an overlayment?
There are many different kinds of cementitious coating materials that can be used to build up the flooring. They can: fill in holes, pits, and cracks; fix leveling issues; or strengthen, protect, and repair the substrate.
Choose a System That Will Look & Perform the Way You Want:
Epoxy flooring systems can fall into several categories including solid color, metallic pigment, flake/chip broadcast, quartz sand broadcast, and more. It can be helpful to ask yourself, what kind of performance you need from the finished floor given the kind of space it is being installed in. The type of epoxy flooring you choose affects the products needed, and even the number of coats recommended.
You should also consider the following questions:
- Do you need specialty coatings like Static Control (ESD) or Decorative Slurry/Mortar systems?
- Do you want a shiny high-gloss topcoat or a satin/matte topcoat?
- Do you want anti-slip additives?
- Is this a residential, commercial, or industrial space?
- Does the floor need to withstand high traffic? Vehicles? Tire marks?
As you can see, epoxy flooring installation is not simple. To learn more about your options, contact us! Product data, recommendations, and system guides are available upon request. Answering the questions above will help expedite the process!
Moisture testing is absolutely essential for your concrete flooring. Following the proper process prevents the products you apply from failing due to high moisture vapor content. This can happen with both new and old concrete. Radiant in-floor heating does not prevent you from having high moisture vapor.
It is important to understand that moisture testing takes 3 days or 60-72 hours. The Calcium Chloride Test is one of the most well-known tests to measure the moisture vapor levels in a concrete slab. It is the standard test used by the majority of flooring contractors in the United States. The American Society for Testing and Materials (ASTM) states that Moisture Vapor Transmission Rates (MVTR) of four pounds per 1,000 square feet over a 24-hour period is the maximum rate allowable to successfully cover concrete with adhesives, sealers, or coatings. Per ASTM F1869, test density is required to equal 3 tests in the first 1,000 square feet, with one additional test for each additional 1,000 square feet of the concrete slab surface. MVTR can be determined by comparing the weight of the calcium chloride in the test before and after the test time (60-72 hours). It indicates not just whether moisture is present, but the quantity and MVTR traveling upwards through the slab. It is recommended to follow all product instructions included with your Calcium Chloride Tests.
STEP #1: Identify how many tests you need, and plan out their placement across your flooring area. The test site should be at the same temperature and humidity expected during normal use. For example, 2,000 square feet (SF) requires 4 Calcium Chloride Tests (3 tests for the first 1,000 SF + 1 test for the remaining 1,000 SF).
STEP #2: Prior to placement of the tests, the test areas should be clean and free of all foreign substances. It is recommended to use a diamond grinder to prep each test area (20” x 20”) 24 hours prior to testing.
STEP #3: Pre-weigh each test with the lid on, using a gram scale accurate to 0.01g. Verify the starting Dry Weight that is printed on the test. Write on the lid the Start Date & Time you are setting the test. Under Plot No. write down the location you are setting the test. For example, NE Bathroom.
STEP #4: Remove the lid from the test and carefully place the test on the prepped floor space without spilling any of the calcium chloride. Place the lid under the open dish. Avoid mixing lids with dishes from other tests.
STEP #5: Remove the release paper on the plastic cover and immediately place the plastic cover over the calcium chloride dish and press firmly to make an airtight seal. Complete this step with all tests placed.
STEP #6: Leave the tests undisturbed for a minimum of 60 hours. DO NOT EXCEED 72 HOURS! Be sure to note the Start Date & Time the test was started and collect the test within this timeframe.
STEP #7: After 60 hours, and BEFORE 72 hours, have passed, remove the cover and replace the lid on the test dish. Make sure that none of the calcium chloride is spilled. Record the Ended Date & Time on the lid.
STEP #8: Using a gram scale accurate to 0.01g, weigh the test dish with the lid on. Record the Finished Weight on the lid. Take the Finished Weight in grams and subtract the Dry Weight in grams. This will give you the Weight Gain in grams. Take your Start and Ended dates & times and calculate the Total number of hours exposed.
STEP #9: Depending on the manufacturer of your Calcium Chloride Test, there are several online calculators available. For example, Taylor Tools Calcium Chloride Tests can be calculated online at: https://www.taylortools.com/calculator
STEP #10: Using the online calculator, input the Weight Gain in grams and the Total number of hours exposed. This will give you the final number you are looking for, pounds of moisture vapor emitted over 1,000 SF in 24 hours.
*IMPORTANT NOTE* – Check your specific Product Data! Different coating products can handle various amounts of moisture vapor. For example, many standard epoxy primers cannot handle above 3 lbs. of moisture vapor. However, do not worry! We have special products that can handle up to 15 lbs. of moisture vapor and above!